Tag Archive | "DIY"

Mommy DIY “Pics Make It Personal”

Tags: ,

Mommy DIY “Pics Make It Personal”

Posted on 22 February 2011 by Kari Gibson

Guest Blogger- Hello My Crazy Adoption blog readers!

Today I am bringing you some tips for decorating your home. Not just any decorating mind you! While there is a time & a play for seasonal decor … and a time & a place to have interior decorators (for those that do) … there is also a time & a place for family. Can I say MORE than a time & a place? Dare I say it: family should be incorporated into your every day living – every day! In this day & age, it is easy to get swept up into the world of Ikea or Pottery Barn or many other stores that help you design, decorate, organize and create your space. But the biggest mistake I see people making? NOT incorporating family photos into their world & their walls.

In June of this year (http://machcphotography.com/2010/06/using-photographs-personalizes-a-space/) I talked about my love of 9 by Design (I’ve heard they are filming a new season! wahoooo!) and the simple sentiments that Cortney shared, “using photographs personalizes a space.” I couldn’t agree more!

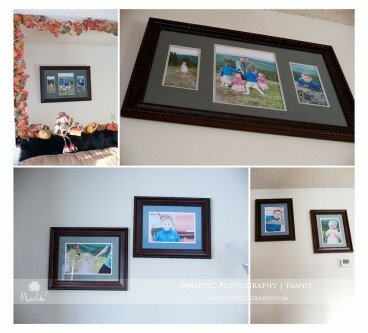
Here I’m sharing with you how my own clients (http://machcphotography.com/) have used our child & family sessions to their advantage, making their living spaces more personal than ever. I hope seeing their ‘real life’ examples gives you the strength to do one of a few things a) hire a professional photographer once a year so you can get some family photographs with YOU in them (yes, I am talking to you, mom! occasionally I have a few dads who are behind the cameras in their families, but usually it’s mom on that point n’ shoot – which means she is NEVER in the picture!) and b) get your professional images up on your walls at home. There is nothing more amazing than when I walk into my clients’ homes and their 18 month old greets me with smiles, giggles & pointing to a row of family photographs, where all I can make out is that he is telling me about “dada” and “brother” and their fun time skipping rocks together. If you don’t believe your children notice, I hope that story makes you stop in your tracks. They do! There is nothing more enjoyable for them than seeing your family love displayed on the walls at home for them to look at & share with anyone who walks through that door.

Many of the images you see here that are displayed in them main living areas of these family homes, are no less than 16×20 in size. No less! Yes, the term ‘go big, or go home‘ comes to mind … although maybe we should change it to ‘go big for your home’ ;) what do you think? When you are looking at a family of four or more, the family photograph (that includes all of you) should be no smaller than 16×20. Use matted & framed 5x7s, 8x10s, and 8x12s to fill smaller spaces in your home, leaving the prominent display areas for large family images that immediately make an impact when your family & friends walk through the door.

This family (IMG_2584KBfamily walls) created a Fine Art Canvas gallery display based on some sample designs I sent her way. In the end, what you are looking at is (6) 10x10s, (3) 10x20s and (1) 16×20 (the middle family image). With the chair & the side table, you can bet this makes an immediate impact upon walking in their home.

I hope you enjoyed this quick look into how I’ve worked with my clients in developing their own personal space. Nothing will give you greater joy and fill your room with instant love than hanging photographs of those you love in the space you spend your time. Your kids will thank you for it for years to come!

To see more on my blog, please visit: http://machcphotography.com/
Stop by Facebook & hit that Like button!
I’d love to see you there!

Happy Decorating!!


Comments (1)

Guest Blogger – {DIY} Africa to your heart Craft

Tags: ,

Guest Blogger – {DIY} Africa to your heart Craft

Posted on 20 January 2011 by Kari Gibson

Our family is on that long roller coaster ride that I’m sure many of you have been on.  You know I’m not talking Disney World!  It’s called ADOPTION.  Currently we are buckled in and coasting on that part of the roller coaster that is not so bad.  We are in the process of adopting a 4-5 year old boy from Ethiopia. We have been waiting almost 6 months now on the Gladney waiting list.  My husband and I have two daughters, ages 13 and 9 and are so excited to be adding to our family through international adoption.  The average wait time for the age and gender we are requesting is 9 months so hopefully this roller coaster ride will make a turn soon and we’ll all start shouting “Wheeee” when we get to the next stage!

I am a stay-at-home mom that loves being creative.  You may know me from my Africa ornaments.  I have an Etsy shop called From Africa to Your Heart http://www.etsy.com/shop/EthiopiaAdoption where I sell all things Africa related. It’s been a busy fall making ornaments!  You may have even visited our blog before: http://jenkinsethiopiaadoption.blogspot.com/

I thought I would share a fun project with you that is inexpensive and fairly easy…a Journal.  The ladies in our Sunday School class had a gathering a few years ago and we all made these.  The one I’m going to create below is an adoption journal. Think of what a great gift this would make for someone.  Save all the photos that people send you this year in their Christmas cards and if you’d like to give them a gift at some point in the year, pull out that photo because you can use it in this craft!

Supply List

  • Composition Notebook (you’ll see an example in the photos below)
  • 2-3 Pieces of coordinating Scrapbook Paper
  • Rubber Cement
  • Ribbon
  • Photograph
  • Embellishments of Choice
  • Scissors
  • Glue Dots
  • Mod Podge (Optional)

Instructions

1. Lay out your first piece of scrapbook paper and with a ruler, cut out a portion that fits size of the notebook.

2. After you cut off the bottom portion of the paper so the paper now fits the size of the notebook, you’ll glue it starting on the back as seen in the next photo. I highly suggest rubber cement as it won’t curl your paper.  The paper should wrap around onto half of the front of the notebook.

3.  Now cut another piece of coordinating scrapbook paper in the same way you cut the first piece. This one will be glued to the front and wrapped around onto the inside of the cover.

4. Your notebook should now look like this.  For extra durability, you can optionally add a thin coat of Mod Podge to the front and back.

5. Now,  take a photo and glue it onto the front. You can embellish the front any way you’d like.

6. If you’d like to add a ribbon, use glue dots to attach the ribbon around the front and back of the notebook and the finished product will look something like this:

You can cover the inside front and back cover completely as well.  Really, the way you design this is up to you.  I have made these in the past as gifts and you can use themed paper for the person you’re giving it to.  Here’s a few ideas.

1. Use scrapbook paper featuring music notes and make a notebook for your child’s music teacher.

2. Use teaching themed scrapbook paper and make a notebook for your child’s teacher.

3. Use sports themed scrapbook paper and make a notebook for your child’s coach.
As you can see, the possibilities are endless. If you have any questions about the instructions, feel free to email me at and I will be glad to help!

Debi Jenkins

Comments (1)

11 Crazy Ways To Make A Turkey Gobble

Tags: , , ,

11 Crazy Ways To Make A Turkey Gobble

Posted on 22 November 2010 by Kari Gibson

I love finding awesome activities for Mommy DIY.  Here are 11 crazy ways to make a turkey gobble with your kids this Thanksgiving holiday.  Click on the links and have some turkey fun!!  Bloggy friends, what is your favorite thing to do at Thanksgiving with your kids?

1.  Bakerella’s Turkey Pops.

2.  15 Different Ways to Make Turkey Cookies.

3.  Thanksgiving Turkey Luminarias craft.

4.  Colorful Turkey caddy fun.

5.  Yummy Turkey Sundaes.

6.  Gobbling Good Cupcakes.

7.  Feather Foliage Craft.

8.  Teeny Turkeys Appetizer.

9.  Put on a happy snood game.

10.  Thankful Turkey craft.

11. Rice Crispy Gobblers.

Comments (0)

Mommy DIY + 5 Crazy cute things to make for Easter

Tags: , , , , , ,

Mommy DIY + 5 Crazy cute things to make for Easter

Posted on 31 March 2010 by Kari Gibson

I love making fun crafts with the kids, but this year Hannah is helping her little sis make a few fun things for Easter.

1.  How to make Speckled Easter Eggs-

Robin's Egg Place Cards
For tea-stained eggs, add 2 tea bags to glass of hot water and allow to steep. Lower egg into water for several minutes until desired color is reached. Set aside to dry.
For blue eggs, combine 1 drop of blue food coloring with 1 drop of green food coloring in glass of water. Feel free to play with different amounts of food coloring to adjust the color. Lower egg into water and set aside to dry.
To speckle eggs, we used one bottle of brown craft paint and a toothbrush. Dip brush into paint and lightly splatter and dab around the egg to achieve a random, lightly dotted pattern. Allow to dry.

2.  Beady Babies-  These baby chicks are so easy to make, you can have an entire clutch ready in time for Easter. View Craft

Beady Babies

3.  Easter Bunny Cupcakes- You don’t have to grow a garden like Mr. McGregor’s to have a family of rabbits show up at your house on Easter — or any other time. View Recipe & video.

4.  Bunny Ears for Kids-  These cute bunny ears are a perfect Easter craft for kids. Easy to make, and lots of fun to wear, have your little bunnies go on their chocolate hunt in Easter spirit.  • View the full Bunny Ears for Kids instructions

5.  Chick Easter Card-  Everyone loves a craft that uses a child’s hands to create it. This cute and sunny yellow Easter chick card makes a perfect holiday greeting for Mom, Grandma or anyone you care about.  • View the full Easter Chick Card instructions

Comments (3)


Advertise Here
OUR GOTCHA DAY VIDEO!


Photos from our Flickr stream

See all photos

Advertise Here

I Partner With


Uganda Missions Trip

Join us in Uganda!

Korah Donations


Share the craziness by pasting this code on your sidebar!